Sunday, December 26, 2010

Holiday greetings from Bond

I sent this out s an e-mail yesterday. I was told my pictures were broken, though, so I decided to make a blog post, and share it with everyone...


Bond wanted me to convey his Christmas greetings to you all. Please bear with him, he speaks in LOLcat... the strange language of cats, which is rather phonetic (i.e. just sound it all out). If you are not familiar with it, rather amusing examples can be seen athttp://www.icanhascheezburger.com

Now, for Bond's holiday message...


O HAI DARE!!!!


It iz i, Bond, heer to bring u da gud nooz... IZ CURSMAZ!!!!! O MI GOSH, I SO XSIGHTED!!! I no, iz hard to tel...

buht reely, i iz heer to weesh u Mary Cursmaz. Mai hooman haz bin nise enuf to convay dees greetins for meez...

So enjoy ur hollydaze and ur napz, and has a nise toofousandelebenty! (dat meens 2011 fur u peepul hoo lik numburs)

Urz Troolee,
Bond


Friday, November 12, 2010

Hodge podge

Well I haven't posted in awhile... boo... I haven't had a huge amount of time to make things lately... been out of state and then got sick when I returned. In the interest of catch-up, I think I'll post the things I've already uploaded pictures of =)  The last picture has some language in it that some may find objectionable, just to warn you ;P


This is a clock I made from a record. This is so SUPER easy to do. This is for my mom, made out of a Tom Jones record. I got both the record and an old clock at the thrift store... cost about $2 total. I painted the hands so they would stand out more.


And here are some dishrags I crocheted, also for my mom. Used Sugar 'n' Cream, double crochet. Nothing fancy whatsoever, but I know they will be functional and work well, so my mom will appreciate them.


I don;t know what you called these... but it;s a thing to put on your eyes... it's filled with rice and lavender - it can be heated in the microwave or cooled in the freezer.


This is a doll I made for a friend, based on something out of World of Warcraft... it's the druid tree form. I really need to add something to spice it up. The character in the game also has on a necklace, but that is pretty plain also... so I'm not sure what else I can add. Maybe I will make it a Santa hat, just for fun ;)

For the same friend... druids can take four forms... these are little felt pins of the symbols for those forms.

There is no really good way to photograph these... but this is one of the dish towel aprons I've made. Really simple and inexpensive gift.


And then there are some selections from Subversive Cross-stitch... a great book I recently picked up. These are for my friend and my cousin... I'm going to make another one of the Boo F'ing Hoo one... my professor at school saw me working on it and thought it was hilarious, so I'll have to make one for her now ;)

Friday, October 15, 2010

Old-Fashioned Silhouettes

This year, I have decided that a majority of my Christmas presents will be handmade... so about a month ago, I asked my mom if there was anything I could make her for Christmas that she would particularly like. She told me that she'd like to have a couple of old-fashioned looking silhouettes to hang on her wall, so I set about thinking of what I could do. This is what I came up with...

The frames come 6 in a pack and are from Dollar Tree. They are made of foam, designed, I think, to be place card holders at showers. I used acrylic paint and a foam brush to paint them black.

For the silhouettes themselves, I used a book of clipart by Dover. Their books come with CDs that contain all the images. You could also find clipart online, though, or you could make your own.

I re-sized each image to be about 500 pixels wide, and printed at 300 dpi. I wanted the paper to be a bit special, but I must have gotten rid of my parchment paper in the move, so I printed on watercolor paper. As you may guess, this did not work out that well... given the bumpy texture of watercolor paper, I didn't get a consistent image. So, I went back in with a calligraphy pen and india ink and colored in each silhouette by hand.

I found the easiest way to get these in the frames was to detach at least two sides of the backing, then to slide each print in and glue the back on.

I then wanted to make them into two sets of three, so I used some ribbon scraps I had to make little hangers for each set. Basically, this is two strips of ribbon, layered together and glued to the back of all three pictures. I used the leftover tails of ribbon at the bottom, looping the ribbon back on itself to make a ruffley sort of effect, so it would look more decorative.

The backs of the pictures were looking pretty rough after this, so I then covered them in black felt, so they'd look a bit more finished. Given that I had everything but the frames on hand, this project cost me a whopping buck, and I know my mom will really love it!

Wednesday, October 13, 2010

More fun with t-shirts

I have a lot of posty catching up to do... Took pictures of lots of crafty things yesterday. Right now, I think I will share some more t-shirt projects.

Here is another freezer paper stencil job.

Shiz is the school from the musical Wicked. Galinda (Glinda) and Elphaba (Wicked Witch of the West) meet there. I made this for my cousin, as she really likes Wicked and I thought this would be sort of a funny design. I used the font "Varsity". It was a two part stencil job, and I admittedly did not do the greatest job with part two (where the letters got filled in), but I think it looks acceptable. It wasn't until I was halfway done that I realized they actually make an official shirt like this. I made this one from a tee I picked up at the thrift store for a buck.


Also made from t-shirts are these reusable shopping bags. Kind of hard to tell that, I guess.... second shot may help. Basically you chop off the arms, some of the neck, and sew the bottom shut. I put gussets in mine so the bottom would be flat, as well. I got the idea from Martha Stewart... even did an I <3 NY one like her's, obviously.


I probably made about 10? All with shirts I got from the thrift store for $.50 or $1.00. Mostly done with locale shirts. Some CO and Santa Fe ones for my mom (places I've lived that she's visited), and then the ones as above. I was thinking of giving some of these to Tom's mom. She likes Europe, and I did a Mediterranean and London one... she likes NY as well. Tom doesn't think she'd use them, though. I did Link (Olde School), Thor (Marvel... this is my favorite one), and Vegas ones for myself, and I have to admit, I keep forgetting to use them myself. I have them in my car. I think it's just going to be a matter of forming the habit.

Anyhow, these are super quick, fun, cheap, and seem really sturdy. I tried carrying around a huge thing of laundry detergent in mine and it did just dandy. Obviously, the size of the shirt will sort of dictate what you can use the bag for. I made one with a 2X shirt that I've used as an overnight bag. I think small and medium are really ideal stand-ins for your typical plastic grocery sacks, though.

Have fun scouring the thrift store :D

Monday, October 11, 2010

Ho ho ho... and glass etching

Yes, I changed to a Christmas layout. I'm just not feeling fall this year, and since most of what I'm working on is Christmas gifts...

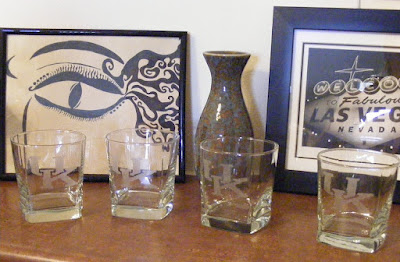
And speaking of which... this year I've been inspire to try some glass etching. I used the Armour Etch cream you can get at the craft store. Mine came from Michael's, 12.99 for a little jar of the stuff, but I used a 40% off coupon on it,

I was inspired to try it by some posts I saw on Craftster. Originally, I started using stencils I cut out from contact paper. This, however, did not work out too well. It was hard to get them to lie flat on the curvy glass, and I had a lot of bleeding in the designs. So, then I tried an alternative idea I saw on Craftster... fabric paint! Yes, the puffy stuff you use to paint horrible designs on clothing ;) You just lay your design on the opposite side of the glass and go over the edges with the paint. Once dry, you have a nifty little containment field for your etching cream. Unfortunately, I tend to have a bit of a shakey hand, but these still turned out better than my contact paper attempts.

The etching is a little hard to see, so I apologize. This first set has the University of Kentucky logo. These will be a Christmas gift for my uncle. Think I'm going back to Kentucky for a visit home soon (UGH, plane ride...), so these will probably go in my carry-on... the less I have to ship the better.


These are for Tom. He's been playing World of Warcraft for years, and has an affinity for the side known as the Horde, and this is their logo. He plays the opposing faction (Alliance) with me right now, but I know he is Horde at heart ;P 


The glasses I picked up at Walmart. About $9 for a set of 16! Cheaper than Dollar Tree, where I went first. I ruined 4 of the big ones trying the contact paper stencils... so I'm left with 4 small ones. Not sure what I will do with those yet! I was thinking some Harry Potter glasses for Tom's mom, but we will see.

Friday, October 8, 2010

Happy sidewalk is happy

Tuesday, October 5, 2010

Acrylic paint, how I love thee...

 Let me count the ways. You can paint on wood, on canvas, on other types of cloth, on clay, and on clothes. These are the things I've done recently, anyway. Quite a bang for my buck (or less), I'd say.

My latest endeavor was using acrylics and fabric medium in order to paint some designs on t-shirts. I did freezer paper stenciling, an idea which I got off of Craftster.org. I was going to link the original tutorial, but now I can't find it! Basically, you use an exacto to make a stencil out of freezer paper, and then you iron it on to your shirt (or other surface). The freezer paper is waxy on one side, so the waxy side faces down and adheres to your surface. Then you can fill in the cut out parts with pain (mixed with fabric medium).

These are my first two attempts at doing it.
The one at the top is for Tom. We both love The Big Bang Theory. Bazinga! is what the character Sheldon says, when he thinks he's one-upped someone =) Tom has commented on wanting one of the official "BAZINGA!" shirts from the show. I decided I'd try to make one instead. I used the font Badaboom, and drew the lightning bolt myself in GIMP.

The second one is for my uncle. I'm still not sure how I feel about how this turned out. It's SUPPOSED to be a Ford Mustang, which I do think you can tell... but it's not as nice as I was hoping. I used a piece of clip art for this one. It may just not have been the best piece to use for something like this.

I just finished the painting today. They've been heat set with an iron. Now, I just need to wait 7 days (according to the fabric medium) and then I can try washing them. I'm anxious to see if they survive, and if the texture of the paint softens up a little bit. After the $ I spent on blank t-shirts, fabric medium, and a roll of freezer paper, I probably could have just bought the freakin' Bazinga shirt.... but at least now I have plenty of paper to make more stencils, and plenty of fabric medium.

Stockings for me, stockings for you...

You have a stocking, I'll have one too... Yes, we've gone CRAZY! So hurry down to Ashy's Stocking Emporium and get your stocking today! Stocking stocking stocking....

*ahem*... Right. So, for those of you that may not know but care to hear, I recently divorced and had to leave my house and get rid of a lot of my things. Me, the insane Christmas lover that I am, was understandably feeling rather grinchy when this all happened, and a lot of my Christmas stuff ended up going. This included the stockings of myself and my kitteh, the eebil Bondinator. Yes... he still gets a stocking, even though he is eebil. Even eebil kittehs need Christmas presents. Plus I have a new boyfriend, Tom, with smaller, younger, rapscallion kitteh, Zoe. Rapscallion kittehs definitely need Christmas presents, in a vain attempt to control their mischief-making. So, this meant I needed me some stockings.

Enter McCall's 4990, "Stocking B" variety.

Tom isn't big into Christmas, so I wanted sort of a fun, cute print for him- something that would seem sort of guy-ish. This was what I came up with. Lined with bright red cotton.

The poinsettias print is really pretty. It may be hard to tell in the picture, but the style has a very retro 50s sort of feel to it, in my opinion. I made two in this print - one for me and one for my mom. Lined with olive green cotton.

All fabrics came from Hancock's, just in case anyone fancies them. I used iron-on interfacing to give them some body. The pattern called for sew-in, but I had iron-on on hand.

I can count on one hand the number of patterns I've sewn from in my life (unless you count my own hand-drawn ones), and this had me pulling my sewing machine out of the closet after a good 4 years on the shelf, so I'm by no means a great seamstress. Given that, my saying these were quick and easy should mean something to you ;)  I did have some issues with the cuffs being a little big and not knowing where to bunch up the excess, but that is about it. I'm already thinking about making stockings for everyone else on my list.

So Tom and I (and my mom) were taken care of... but what about kittehs!?!? Enter paw print clip art, enlarged and printed out, to serve as my pattern.

The colors on Bond's were just NOT camera friendly. Also, I'm not very camera friendly... at least not indoors. Bond's name is actually embroidered in green.

These quite honestly were a bit of a disaster. I was a space cadet the entire time I worked on them. I wanted to hang them from the base of the paw, not the toes, but I embroidered the names the wrong way. And then I got so caught up in sewing that I sewed them completely shut and had to pull out the seam ripper. I sewed Zoe's together before I sewed the paw pads on the outside... etc. Finally done, though, and just a little worse for wear. They will hold some nice furry mice and jingle balls, and maybe... if they are extra good (ha... HAHAHA!!!), Santa will leave some catnip!

If I wanted to stuff Zoe's with her favorite toys, I'd put in a ball of yarn, twill tape, embroidery floss, small scissors, and steel wool... she's a little klepto, stealing all my craft supplies! As I said, rapscallion kitteh!

Spell check does not believe that "kitteh" is a word... the nerve!

One year later...

Well, I just deleted a post from here, dated 10/07/2009, titled "Maybe I'll actually blog now?". That was the last and only post I made... so I think we know the answer to that. However, in an effort to work on showcasing my creative side, I've decided to try again. This will probably be a place for me to showcase the things I make. With the holiday season approaching, and me already well underway with gift making, there will probably be a lot of posts soon! After that... who knows? ;)