Nearly 9 months since I last posted... BAH! BAH I SAY! I'm just no good at this blogging thing. Perhaps it's because I haven't been very crafty in the past 9 months, except for making up things for the wedding. I suppose that is a big exception, however ;P
What a 9 months it has been, though. Put together a wedding, got married, and now pregnant with our first child! It's too early to know if it is a boy or girl, but we'll be finding out ASAP... I'm too much of a planner to wait for it to be a surprise :P
With baby on the way, I have been picking up some crafty slack. I've made a set of soft blocks, and will make some toy balls soon. I'm also doing some graphics work, making a set of silhouette alphabet prints to frame and hang in the baby's room. It's composed of all the geeky things we like (e.g., J is for Jean-luc Picard, C is for Companion Cube, T is for TARDIS). Photoshop is a cruel mistress, however, and it's taking me longer than I would like. I have a bone to pick with their color replacement tool.
I also used some bridal shower gift cards to raid the local Hancock Fabrics during their big clearance/New Year's sale. I got supplies for making several slings, a nursing pillow, and a diaper bag, along with bits and bobs for some more baby toys. Now I just need the hubs to help me get my sewing machine cleaned and oiled. If only I had not lost the manual :P
Some of the fabric I found has ROBOTS on it!! So a robot diaper bag is hopefully going to happen. I think we will be going with a robot theme for the nursery, too. I love robots! ^_^ Important caveat... I love robots just as long as they are the cute kind, and not the I'll destroy the human race and rule the world kind. I also got a Cricuit (thanks to my friend/ex-SIL who was nice enough to sell me her old one!) and the robot cartridge for that, so I imagine I will be using that to make some fun wall art, too :) Another friend informed me that Target has ROBOT stuff in their dollar spot right now... I'm going to have to check that out!
So, there you have it, my attempt at an update. I'd like to say I'm making it a New Year's resolution to blog more, but I know for a fact that won't actually make me blog anymore. Here's hoping, though!
Wednesday, January 4, 2012
Saturday, April 23, 2011
More bride freebies
Hooray! More bridal spoils have arrived since I last posted!


Thank you Circulon and KitchenAid! :)
I hope you all have a lovely Easter! I have a nice ham dinner planned. Nom nom nom nom nom...
That is all.
Tuesday, April 19, 2011
Vinyl d'art
Tom and I moved into a new townhouse a few months ago, giving me a lot more wall space than I'd had in my one bedroom apartment. I've been trying to find cheap ways to decorate, and was inspired by this post over at TulipSociety and a related Instructable. As much as I love trees and flowers, I decided I wanted something a little... edgier... that would represent both Tom and myself. I liked the ease of cutting out the circle shapes, and my mind immediately went to gears. Tom and I both appreciate Steampunk, so I thought this was perfect.

How badass am I? With my steampunk gears! And... pastel... flowers... yeah. Oh well. That's me for ya. The hardest part of this was trying to make each gear unique in some way.
I put this in the living/dining area, which already has plenty of stuff in it, so the purpose of hanging something wasn't to muffle sound - I needed something purely decorative. This fit the bill perfectly. Once I cut them out, I just peeled, stuck, and VIOLA! Vinyl d'art! I've had no problems with them sticking, but they seem as though they will come off easily when required to.
The next project will be the bedroom... it DOES need some sound absorbing action, so we'll see what I can come up with. I'm thinking some simple canvases, once I get the right color paint color.
Ja ne!
Sunday, April 17, 2011
Rockin' robin...
He is on a high branch, in a bare tree, that is swaying in the wind. The wind keeps blowing, the tree keeps swaying, but he keeps holding on. The wind's gotten to be a little too much for him now, so he threw caution (and himself) to the wind, and flew off to find a new spot to sit and watch the world. Ahhhhhhhh, there is enough metaphor there to... make something... overly metaphory. Seriously, though, I could learn a lot from that bird.
Tom is outside pumping up the tires on our bikes. He wants to go for a ride. We'll see how that goes. I prefer to bike on trails, where I don't have to worry about about the motorists in Colorado Springs, an alarmingly large percentage of whom must be stupid, judging by their driving.
I picked up a Sunday paper this week and have been clipping coupons. I started couponing recently, but only with printable coupons I found online. This week, I heard there were going to be a whopping FOUR coupon inserts in the paper, so I decided to pick one up today. I thought I would share how I plan to coupon. Maybe some of this can be classified as "tip-worthy", but I make no promises. Anyhow, here is what I have done/am doing..
- Find a blog that covers local sales/coupons/etc. I was lucky enough to run across SpringsBargains.com, which is absolutely amazing. It lists the currents ads for all the local grocery stores, and matches them up with many existing coupons deals. They even rate the deals on a scale of 1-5, based on how great they think it is. It allowed me to really maximize my savings this week, and I plan to check back each week to see the best deals.
- Check the on-line coupon sites to see what they're offering. Unlike your Sunday paper, checking on-line coupons is absolutely free (assuming you're on a computer anyway), and you only have to print the ones you really want. Here are the ones I like to check. If you know of more, please let me know!
- Coupons.com Printables
- Red Plum Printables
- Smart Source Printables
- Upromise Ecoupons you can load onto your grocery or drug store cards, and savings at restaurants and online retailers. The Savings go into your upromise account, instead of being given at the store. You can then use the money in your account to help pay for college, invest in a savings account, or even request a check. Every little bit helps!
- Cellfire More coupons to load directly onto your grocery card! Here King Soopers (Krogers chain) participates.
- Just 4 U Safeway's own eCoupon program.
- Target Target has their own coupon site. Just go to target.com, and scroll down tot he bottom. There is a Coupons link under the heading "Target Stores" at the bottom. SOme of these are exclusive to Target, and some are manufacturers.
- Know that, at most stores, you can use one manufacturer and one store coupon on a product. So if you have a Target coupon for $1 off, and a manufacturer coupon for $1 off, you can get $2 off one item.
- Know who doubles coupons in your area. Where I am, Safeway and King Soopers always double, and Albertsons only doubles occasionally. A $.50 coupon may not look like much, but $1.00 does!
- Only use coupons for things you usually buy or know you will use, and only use it when it makes something truly cheaper. For instance, saving $.50 on a box $1.50 Kraft macaroni is not that big a deal if I can get the store brand for $.89 without any coupon.
- That being said, I clip ALL the coupons from the paper. At least right now. Why? Two reasons:
- A lot of times, I see deals where things are free or ridiculously cheap weeks after the coupons have been in the paper. Even if it's not something I use, if it's free, I'll take it. Case in point, I just clipped a bunch of things for dog food and treats. I have no dog. If I find some deal where I can get the treats or food for free, though, I'll buy them. I have plenty of friends with dogs, and if nothing else, I can give them to the local humane society.
- I know there have to be sites online where you can swap coupons with people. The dog coupons and baby coupons do nothing for me, but may be awesome to someone else. Maybe they could send me some food or cat coupons in trade! :)
- Become a fan of some of your favorite brands and stores on Facebook. A lot of places are starting to offer their fans coupons. You can also go directly to company websites and sign up for free coupons. I've created an entire e-mail address just for couponing so I don't get spammed to death at my regular e-mail.
- Create some sort of organization system. I'm using clear page protectors in a binder, and dividing things up by categories which make sense for me.
- Understand that every little bit helps. This is a hard one for me. Too often I need to do everything whole hog, and can't deal with mediocrity. I'm trying to remember that ANY savings is a savings. I don't have to be like the crazy people on Extreme Couponing.
Friday, April 15, 2011
It ain't easy bein' green... or frugal... frugal too.
Ok, I have to confess, I know nothing of the trials and tribulations involved in being green... but I find Kermit to be a reputable source of information, so I will take his word for it.
I am, however, finding it extremely hard to be frugal. We've been dealing with a job loss recently, are waiting for unemployment to kick in, etc. Lets just say I'm very thankful for a great fiance, a few supportive family members, and community outreach programs. If anyone would like to send good thoughts/prayers/energy my way, feel free... Trying to find a decent job for myself is proving to be difficult. A psych B.A. does not seem to qualify you for anything that makes a living wage! Oh hindsight, you so silly!
I was about to say that I digress, but I realize most of this post is just going to be venting... so I guess that isn't entirely accurate! However, my main problem is just how difficult a time I'm having with being frugal... more specifically, frugal with food. Keep the lights off and furnace off, check, cutting back on driving, sure, not buying extras for myself, (painful but) ok. ;P
Food, though, is killing me. It always does... and I'm not sure why. I am, I think, a good cook. Certainly a good baker. Somehow, the organizational processes involved in cooking throws me for a loop. I never know what to make with the things I have on hand... and then I never have a lot of basic things on hand, it seems. I think the latter may be my downfall.
Lately, I've been trying to shop very carefully for deals on food... coupons, hitting all the different sales, etc. That seems exhausting enough. Then I have to figure out what to do with the food I just bought. I want so badly to make these nice, healthy, cheap meals I see people making on the blogs I read... but can never figure out how they are easy (yeast bread, cooking something all day) or cheap (since I'd have to go out and buy three different types of cheese and a bunch of fresh herbs and produce). I'm not sure how these people do these things inexpensively! Do they have their own creamery in their back yard? I know a lot of people have gardens, but I have no yard space, and I think a Topsy Turvy Tomato planter would end up about 3 blocks away with the first good Colorado Springs "breeze."
This just seems to happen to me all the time. I get an idea and I read up on it... and then I get overwhelmed with information... and then I have a melt down. Why oh why must I be this way!
Thursday, April 14, 2011
Give me free stuff, give me free stuff, mister...
I am finding out that this bride-to-be stuff can be cool. Stores and companies like you. They give you free things! I never knew this, until I registered at Target, and received this nifty bag... thingy.

It's nothing elaborate, but I thought it was a nice gesture. I was tickled pink that it was white and blue, AND had birds on it. It will work perfectly for what I've been planning for the wedding. I'm planning to set it up as a card "box".
Anyhoo, as I finished shooting random Target items with my nifty scanner gun, I left the store with my freebie in tow, wondering aloud to Tom what other free things brides might be able to get. I decided to do some research. TO THE BAT CAVE, ROBIN! *Ahem* or Google. Google works too.
So I googled, and HOLY FANCY FREE CRAP, BATMAN! I found out that brides can gets LOTS of free stuff from companies whose items they are registered for, and more if people actually buy you the things off your registry. So I registered away, and sent in my forms for my nifty items.
Several days ago, the first fruit of my labor showed up at the door. A great little cheese cutting board/utensil set from De'Longhi.

It is quite nice and I'm very impressed with it!
If you're a bride-to-be, I'd recommend doing a little research to see what is available out there. I'll probably be posting with more freebies as they show up at my door. I'm always thrilled to get a good deal! :)
Thursday, March 31, 2011
More shiny!
One of the wedding issues I'd been wrestling with was the idea of flowers. I love real, live flowers, but they are crazy expensive. So, I'd decided I was going to do silk and make my own bouquet... with blue flowers, or maybe sunflowers for a POP! (even though yellow is not a wedding color). I began thinking again, though, how I'd really rather spring for real. I found a vase type of flower arrangement for around $50 that I thought I could make into a good bouquet, and was contemplating that, until I was browsing Etsy and ran across this...
Gorgeous, no?? I had not heard of brooch bouquets before. I knew I could never afford one of Noaki's lovely creations. I knew I could do something inspired by this idea on my own, however. It's a pretty straight-forward idea, but I like to see how people do things, so I googled brooch bouquets to see what other information I could find. My favorite tutorial was this one from Fancy Pants Wedding. I liked seeing how they wrapped the wire for each brooch.
I knew mine would not be as full as any of the ones I'd seen thus far, as I hand only a handful of brooches to use. I decided to intersperse them with a bouquet of silk flowers. I'd picked up some bouquets of white roses at Michael's, for my bridesmaids to carry, but some of the people I'd invited now are unable to make it, so I had extra bouquets. I decided to use one of these to augment with the brooches. I used silver florist wire I had on hand to make the stems. Other than that, I used a roll of ribbon from Dollar Tree, some floral tape, and $8 worth of beads from Michael's (I wanted little shiny bits and some blue accents to mix in with the brooches.
Here is what I've come up with...


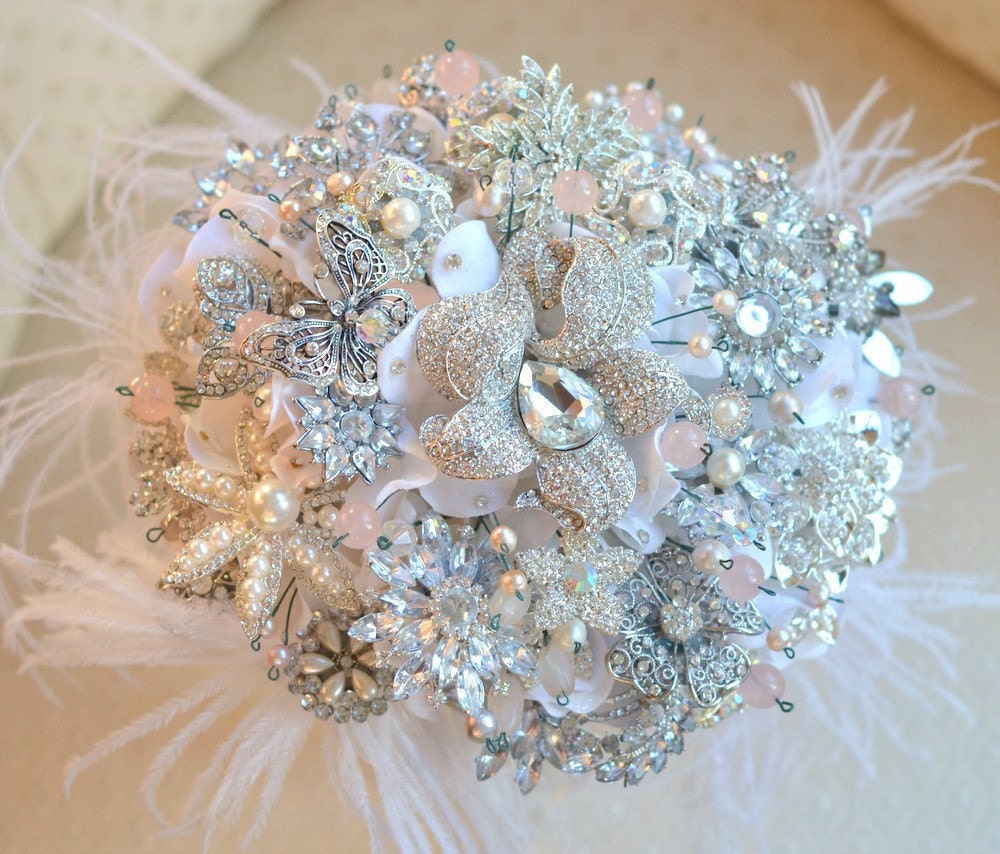 |
| Bouquet by Noaki |
Gorgeous, no?? I had not heard of brooch bouquets before. I knew I could never afford one of Noaki's lovely creations. I knew I could do something inspired by this idea on my own, however. It's a pretty straight-forward idea, but I like to see how people do things, so I googled brooch bouquets to see what other information I could find. My favorite tutorial was this one from Fancy Pants Wedding. I liked seeing how they wrapped the wire for each brooch.
I knew mine would not be as full as any of the ones I'd seen thus far, as I hand only a handful of brooches to use. I decided to intersperse them with a bouquet of silk flowers. I'd picked up some bouquets of white roses at Michael's, for my bridesmaids to carry, but some of the people I'd invited now are unable to make it, so I had extra bouquets. I decided to use one of these to augment with the brooches. I used silver florist wire I had on hand to make the stems. Other than that, I used a roll of ribbon from Dollar Tree, some floral tape, and $8 worth of beads from Michael's (I wanted little shiny bits and some blue accents to mix in with the brooches.
Here is what I've come up with...


I wish you could see how shiny it truly is! I love the bling! The brooches I used belonged to my great-grandmother, so this is also going to be a great way to pay tribute to her on my special day. The wire can be snipped and untwisted when the wedding is over, if I wish to get the brooches back to wear. I think I may leave them in the bouquet and display it after the wedding, however :)
Thursday, March 10, 2011
Here comes the DIY bride...
Hi everyone! :)
I haven't posted in awhile... In the last month or so, I've become engaged, my fiance started a new job, we moved into a townhouse, and we're planning a wedding... plus school, and teaching, and I'm trying to find some sort of part to full time job that will have Tom and I on the same schedule (nights). No luck yet, though.
Anyhoo, I've done very little in the creative department... but there is lots of creative wedding stuff underway. We're trying to do the whole wedding for under $3000... so I'm doing the decor myself, we're DJing ourselves (with iTunes), we're doing all the food ourselves, I'm going to make my own cake, etc.
While I did not feel adventurous enough to make my own dress, when I saw the price tags at David's Bridal, I DID decide to make some of my own accessories.

Here's my veil. The one at DB's was pretty similar, but cost $130! I was able to make this for under $10.


Here are some close-ups of the beading -one with and one without flash. I forget what you call the shapes exactly... are the long ones trumpets and the other ones pillows (they're sort of squarish, not round)? Anyhow, I used less than a tube of each from Hobby Lobby, about $1.25 per tube with their half-off sale. Plus the tulle was probably about a dollar, a pack of combs were $1.99, and then the clear thread (bane of my existence) was a little over $2. It is pretty simple but I am happy with it... It looks shinier in person, and what I really wanted was just some bling, because my dress has no beading or lace whatsoever, so I'm adding details with accessories.
I also made a headband.

Again, just for some bling... the faceted beads have AB coating, so they are quite glimmery in person. The headband at DB was $99, and I'd say this cost me around $10 to make, as well. I got some really thin wire (26 gauge, I believe) and just wove it around the little teeth in the headband, adding a bead in each space. I did two rows together, and then I did a third row on top of those two rows.
I'm trying to get things together for centerpieces right now... which has involved scouring thrift stores for cheap largeish vases... either opaque blue, or milk glass (I <3 milk glass). I only have 3 so far... I need about 14, ideally, so the search continues! I've also been looking for platters at the thrift store. I've found one bigger plate I like... I saw a beautiful limoges china platter this weekend, but it was $13, which is more than I really want to spend. Perhaps I will photog my finds so far and share them in another post.
Sunday, January 30, 2011
Spring's done sprung, at least in retail stores...
Actually, here in Colorado, it has been quite warm outside, as well... but the high Tuesday is supposed to be 1 degree, with a low of -11, so I'm thinking the season are not changing just yet.
But in my heart it has - Christmas is over, and I have no use for cold weather anymore! Apparently retail agrees with me, as I am starting to see lawn and garden stuff everywhere I go, along with springy decorations. This spring invasion includes Michael's dollar section, which has some really cute stuff right now! I created a new table centerpiece (or it would look great on a shelf, too!) with some things I found there.


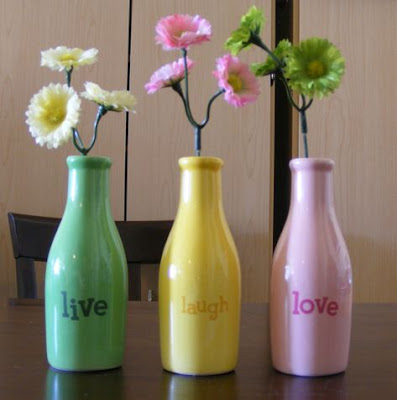
So here is the finished product. I moved the heads of the flowers around so there were three of the same color on a stem. Looking at this picture, I think I will cut the laugh and love stems down some. This would be great with real gerber daisies too, or maybe some carnations. In case you are wondering, the fourth vase choice was a blue one that said "hope", but I wanted to stay with the L theme. Anyhoo, cheap and took me all of 5 minutes to do.
There were lots of other great things in the dollar section, too. Here is what I picked up...

The big green flower is a pin - they had lots of these in different colors and flower styles. I'm going to pin it to some of my plain knit tops to brighten them up! They also had more Valentine's stamps - I had to get this one, because I love keys! The little luminary above was the only one I saw, but they had little metal buckets, without the punch designs, in other brights colors. There were adorable little springy felt embellishments for your card makers, cute drawer pulls, journals and note cards (as usual), and a bunch of other stuff that I am forgetting! If you need a little spring pick me up, I recommend dropping in your local Michael's for a looksy :)
But in my heart it has - Christmas is over, and I have no use for cold weather anymore! Apparently retail agrees with me, as I am starting to see lawn and garden stuff everywhere I go, along with springy decorations. This spring invasion includes Michael's dollar section, which has some really cute stuff right now! I created a new table centerpiece (or it would look great on a shelf, too!) with some things I found there.

They had these mini vases in four different colors.

Not from the dollar section, but these were $1.99. There were actually about six stems of three on here, but I didn't think to photograph things until I had disassembled it! Pardon the crappy photos, by the way - I was taking these at night.

There were lots of other great things in the dollar section, too. Here is what I picked up...

The big green flower is a pin - they had lots of these in different colors and flower styles. I'm going to pin it to some of my plain knit tops to brighten them up! They also had more Valentine's stamps - I had to get this one, because I love keys! The little luminary above was the only one I saw, but they had little metal buckets, without the punch designs, in other brights colors. There were adorable little springy felt embellishments for your card makers, cute drawer pulls, journals and note cards (as usual), and a bunch of other stuff that I am forgetting! If you need a little spring pick me up, I recommend dropping in your local Michael's for a looksy :)
Sunday, January 23, 2011
Tutorialish - Crochet hook case from a dish towel
Hello, and welcome to episode one of Tutorialish. I'm calling this Tutorialish, because I am really not good at taking step by step pictures of stuff. When I'm making stuff, I just want to do, and not take 15 minutes setting up a perfect photo for every step. Those of you that can, yay you! You have drive and dedication, and I salute you. I'm too busy and too ADHD, however, so you'll get nothing and like it!!! Well, you'll get something, just nothing spectacular.
I'm also calling this tutorialish, because to call it a tutorial, I somehow feel like I would be making claim to this being some groundbreaking new idea that no one in the multiple universes (yes, the multiverse, I'm on board) had ever thought of before, and essentially saying, "I AM THE FIRST! BOW TO MY BRILLIANCE, PEASANT!" And I really doubt that I'm the first person to ever do this. But here is how I did it, if anyone cares :)
I am ALWAYS losing crochet hooks, or else I end up buying new ones because I don't think I have that size, and then when I get home I find that I DO have that size. I really wanted to make a crochet hook case to help remedy these problems. I was going to just use fabric and sew one up, but I had this dish towel that I really loved. It seemed so bright and springy, and it was so cold and gloomy here. It seemed perfect. So I set about figuring out a way to use it to make a hook roll.
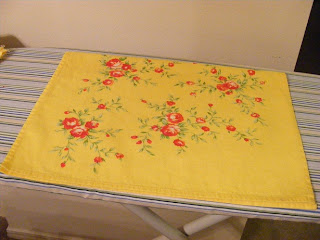
So here is the dish towel. I folded it in half and ironed the fold.

Then, I ironed on some interfacing to half of the towel. I'd say this is probably a medium weight. I just used what I had lying around.
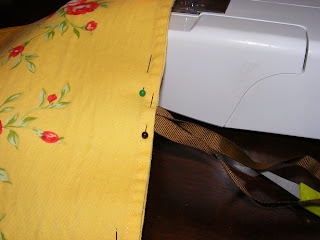
Then I folded it back in half, and pinned. I decided I was going to use a zigzag stitch in a contrasting color around the edges, so I pinned it wrong sides together. I definitely think wrong sides together is the way to go if you are using a dish towel. The hems that are already on the dishtowel would make a right side together seam way too bulky.
You will also note here that I took this opportunity to insert some ribbon for my closure. This should go on one side of the roll (your choice) and will be wrapped around and tied after the case is rolled up. If this makes no sense, check out the last couple of pictures right now - those will hopefully help.
Remember when placing your ribbon, part of this big piece of fabric you have is going to be folded up to make the pocket, and part of it will also be folded down to make a little barrier at the top (to help keep things from falling out), so you won't stick the ribbon smack dab in the middle - you will have to do a bit of figuring before deciding where to put it. Again, you may want to see the later pictures to better understand what I am saying here.
If you ARE sewing with right sides together, remember that your ribbon should be pinned in so that the loose ends are sandwiched between your two pieces of fabric, not hanging out like this.
Ok, so your interfacing is ironed on, your ribbon is pinned in - time to sew up the sides. Just sew up all three open sides. Like I said, I used a contrasting thread in a zigzag stitch,which was apparently stupid, because I had never used a zigzag stitch before and it didn't go very well.... live and learn! Next time, zigzag... next time.

Ok, the sides are all sewn up, and it's time to make the pocket for the hooks. I didn't measure, just eyeballed it. Keep in mind that you need enough for the pocket, and also enough to make the little fold over flap at the top. My advice is to grab your hooks to help you figure out how big to make the pocket. Keep in mind the aforementioned little flap at the top is optional, but I think it is a nice safety feature!
Anyhoo, once you have determined size, fold your pocket up and iron the fold well.

If you want to, you can make a tiny pocket to attach to the big pocket you are making - I made one to hold the big needles used to weave in ends and sew crocheted things together and such (the name escapes me at the moment). You'll start with a small piece of fabric, like the one above.
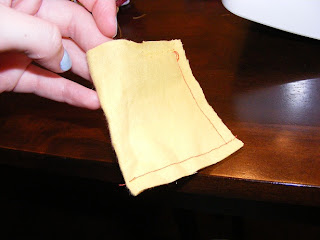
Fold it in half, right sides together (I used flannel, so it didn't matter much), and sew around the open edges, leaving a small opening for turning.
You will then turn it right side out, and position it on your pocket flap and sew it down.

Here is a picture after I had attached it. As you can see, I sewed around the sides and bottom of the mini pocket, and then I sewed a few lines, creating pockets within the pocket.
This is totally optional - I really just threw mine on in a rush, so it is a bit of a mess, but it works! Just remember, if you do it, sew the tiny pocket onto the flap for the big pocket BEFORE you sew down the sides of the big pocket. If you wait until your big pocket has been created to put on the little one, you will be sewing the little pocket and BOTH sides of your case roll together, essentially making that part of the case roll useless for storing larger items. I hope that makes sense...

Now is also the time to make your little flap at the top. I folded a portion of the top down, ironed the fold, and stitched just below the fold to hold it in place. The above picture shows the case holding one hook - you can see how the flap comes over the top of it. If my roll were to get turned upside down and thrown around, this should keep the hooks in it from sliding out and getting lost.

There was a problem, as you can see above. I do own one freakin' big hook, and it is too long for this roll. If I had forgone the top flap, it would have fit, but the roll would have been really big, and I wouldn;t have had the piece of mind that flap provides I decided to just leave this one out. I'd say 99.9% of the crochet I do is with K or smaller, anyway. Plus, how could I possibly lose this guy? He's HUGE!
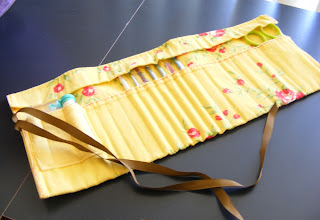
Here's a picture of the finished product with my hooks and doodads in it. I forgot I actually made two big pockets. You see my scissors on the right, and on the left, you see the needle pocket. In the big pocket behind that I have stored my packet of stitch markers. You see my hooks all tucked away, too. I used to have a lot more, but since I didn't have a nice case like this to put them in, a bunch of them got lost :(

Here is how it looks on the outside.

And here it is all rolled up and tied.
Feel free to comment if you have any questions!
I'm also calling this tutorialish, because to call it a tutorial, I somehow feel like I would be making claim to this being some groundbreaking new idea that no one in the multiple universes (yes, the multiverse, I'm on board) had ever thought of before, and essentially saying, "I AM THE FIRST! BOW TO MY BRILLIANCE, PEASANT!" And I really doubt that I'm the first person to ever do this. But here is how I did it, if anyone cares :)
I am ALWAYS losing crochet hooks, or else I end up buying new ones because I don't think I have that size, and then when I get home I find that I DO have that size. I really wanted to make a crochet hook case to help remedy these problems. I was going to just use fabric and sew one up, but I had this dish towel that I really loved. It seemed so bright and springy, and it was so cold and gloomy here. It seemed perfect. So I set about figuring out a way to use it to make a hook roll.

So here is the dish towel. I folded it in half and ironed the fold.

Then, I ironed on some interfacing to half of the towel. I'd say this is probably a medium weight. I just used what I had lying around.

Then I folded it back in half, and pinned. I decided I was going to use a zigzag stitch in a contrasting color around the edges, so I pinned it wrong sides together. I definitely think wrong sides together is the way to go if you are using a dish towel. The hems that are already on the dishtowel would make a right side together seam way too bulky.
You will also note here that I took this opportunity to insert some ribbon for my closure. This should go on one side of the roll (your choice) and will be wrapped around and tied after the case is rolled up. If this makes no sense, check out the last couple of pictures right now - those will hopefully help.
Remember when placing your ribbon, part of this big piece of fabric you have is going to be folded up to make the pocket, and part of it will also be folded down to make a little barrier at the top (to help keep things from falling out), so you won't stick the ribbon smack dab in the middle - you will have to do a bit of figuring before deciding where to put it. Again, you may want to see the later pictures to better understand what I am saying here.
If you ARE sewing with right sides together, remember that your ribbon should be pinned in so that the loose ends are sandwiched between your two pieces of fabric, not hanging out like this.
Ok, so your interfacing is ironed on, your ribbon is pinned in - time to sew up the sides. Just sew up all three open sides. Like I said, I used a contrasting thread in a zigzag stitch,which was apparently stupid, because I had never used a zigzag stitch before and it didn't go very well.... live and learn! Next time, zigzag... next time.

Ok, the sides are all sewn up, and it's time to make the pocket for the hooks. I didn't measure, just eyeballed it. Keep in mind that you need enough for the pocket, and also enough to make the little fold over flap at the top. My advice is to grab your hooks to help you figure out how big to make the pocket. Keep in mind the aforementioned little flap at the top is optional, but I think it is a nice safety feature!
Anyhoo, once you have determined size, fold your pocket up and iron the fold well.

If you want to, you can make a tiny pocket to attach to the big pocket you are making - I made one to hold the big needles used to weave in ends and sew crocheted things together and such (the name escapes me at the moment). You'll start with a small piece of fabric, like the one above.

Fold it in half, right sides together (I used flannel, so it didn't matter much), and sew around the open edges, leaving a small opening for turning.
You will then turn it right side out, and position it on your pocket flap and sew it down.

Here is a picture after I had attached it. As you can see, I sewed around the sides and bottom of the mini pocket, and then I sewed a few lines, creating pockets within the pocket.
This is totally optional - I really just threw mine on in a rush, so it is a bit of a mess, but it works! Just remember, if you do it, sew the tiny pocket onto the flap for the big pocket BEFORE you sew down the sides of the big pocket. If you wait until your big pocket has been created to put on the little one, you will be sewing the little pocket and BOTH sides of your case roll together, essentially making that part of the case roll useless for storing larger items. I hope that makes sense...

Now that your tiny pocket is on, you will sew up your big pocket. I sewed up the sides first, then I went across the pocket and used the little guides on my sewing machine plate (no idea what those are called!) to create different sized pockets. I know the guides delineate different measurements, but not sure exactly what those measurements are, either. I found that using the second line gave me pockets that were big enough for most hooks up through J or so., but it is best to experiment and see what works for you and your hook collection :) I made some larger hook pockets, in case I get some larger hooks in the future. I also made a wide pocket that can store a small pair of scissors.
Now is also the time to make your little flap at the top. I folded a portion of the top down, ironed the fold, and stitched just below the fold to hold it in place. The above picture shows the case holding one hook - you can see how the flap comes over the top of it. If my roll were to get turned upside down and thrown around, this should keep the hooks in it from sliding out and getting lost.

There was a problem, as you can see above. I do own one freakin' big hook, and it is too long for this roll. If I had forgone the top flap, it would have fit, but the roll would have been really big, and I wouldn;t have had the piece of mind that flap provides I decided to just leave this one out. I'd say 99.9% of the crochet I do is with K or smaller, anyway. Plus, how could I possibly lose this guy? He's HUGE!

Here's a picture of the finished product with my hooks and doodads in it. I forgot I actually made two big pockets. You see my scissors on the right, and on the left, you see the needle pocket. In the big pocket behind that I have stored my packet of stitch markers. You see my hooks all tucked away, too. I used to have a lot more, but since I didn't have a nice case like this to put them in, a bunch of them got lost :(

Here is how it looks on the outside.

And here it is all rolled up and tied.
Feel free to comment if you have any questions!
Subscribe to:
Posts (Atom)